Build an iOS App then publish to TestFlight
This article shows how to build and publish an iOS App to TestFlight manually or automatically with Xcode Cloud.
Goals
After pushing a
committo themainbranch of theGitHub repository:bashgit pushXcode Cloud should automatically start building the app and publish the build to
TestFlight.
Prerequisites
- Your
Apple IDhas joined the Apple Developer Program - A
GitHubaccount
Create an Xcode Project
Create a New Bundle ID
Every Apple app has a unique ID, known as a Bundle ID. You can apply for this ID on the Apple Developer website: Apple Developer > Account > Certificates, IDs & Profiles > Identifiers. 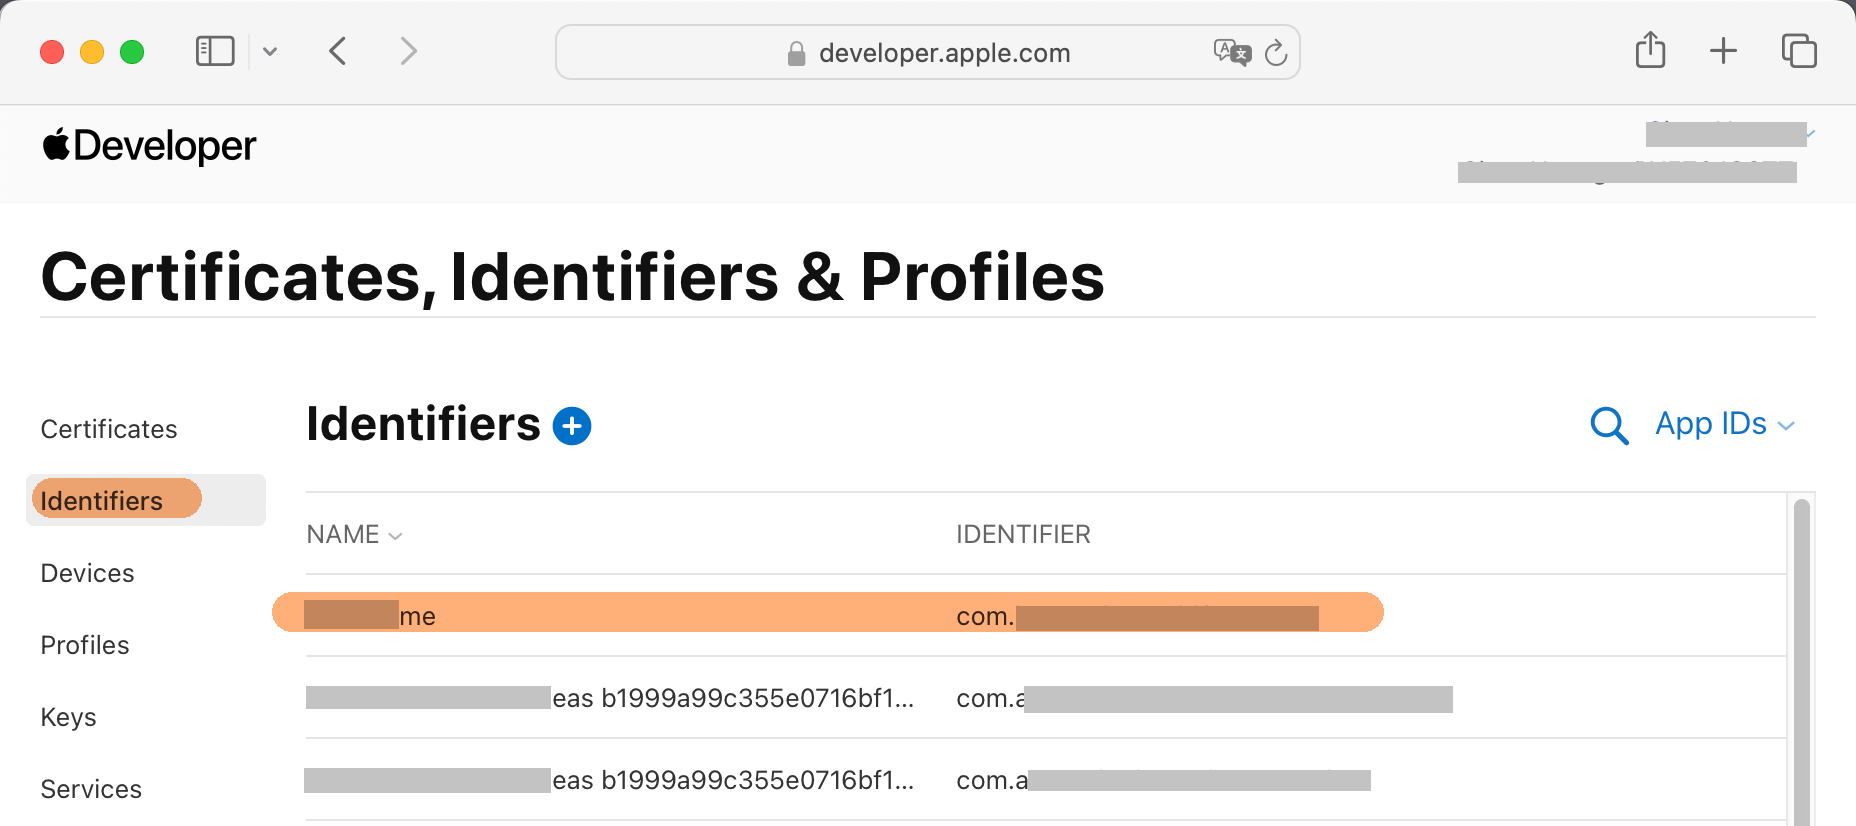
Create an App Store Connect App
To publish your app to the App Store, you must use App Store Connect. Tasks such as app updates, adding TestFlight testers, and viewing Xcode Cloud logs are all done through this site.
- In the Apps page, click New App.
- Fill out the New App form. You may wonder what to put for SKU — you can enter anything; typically, I just use the
Bundle ID.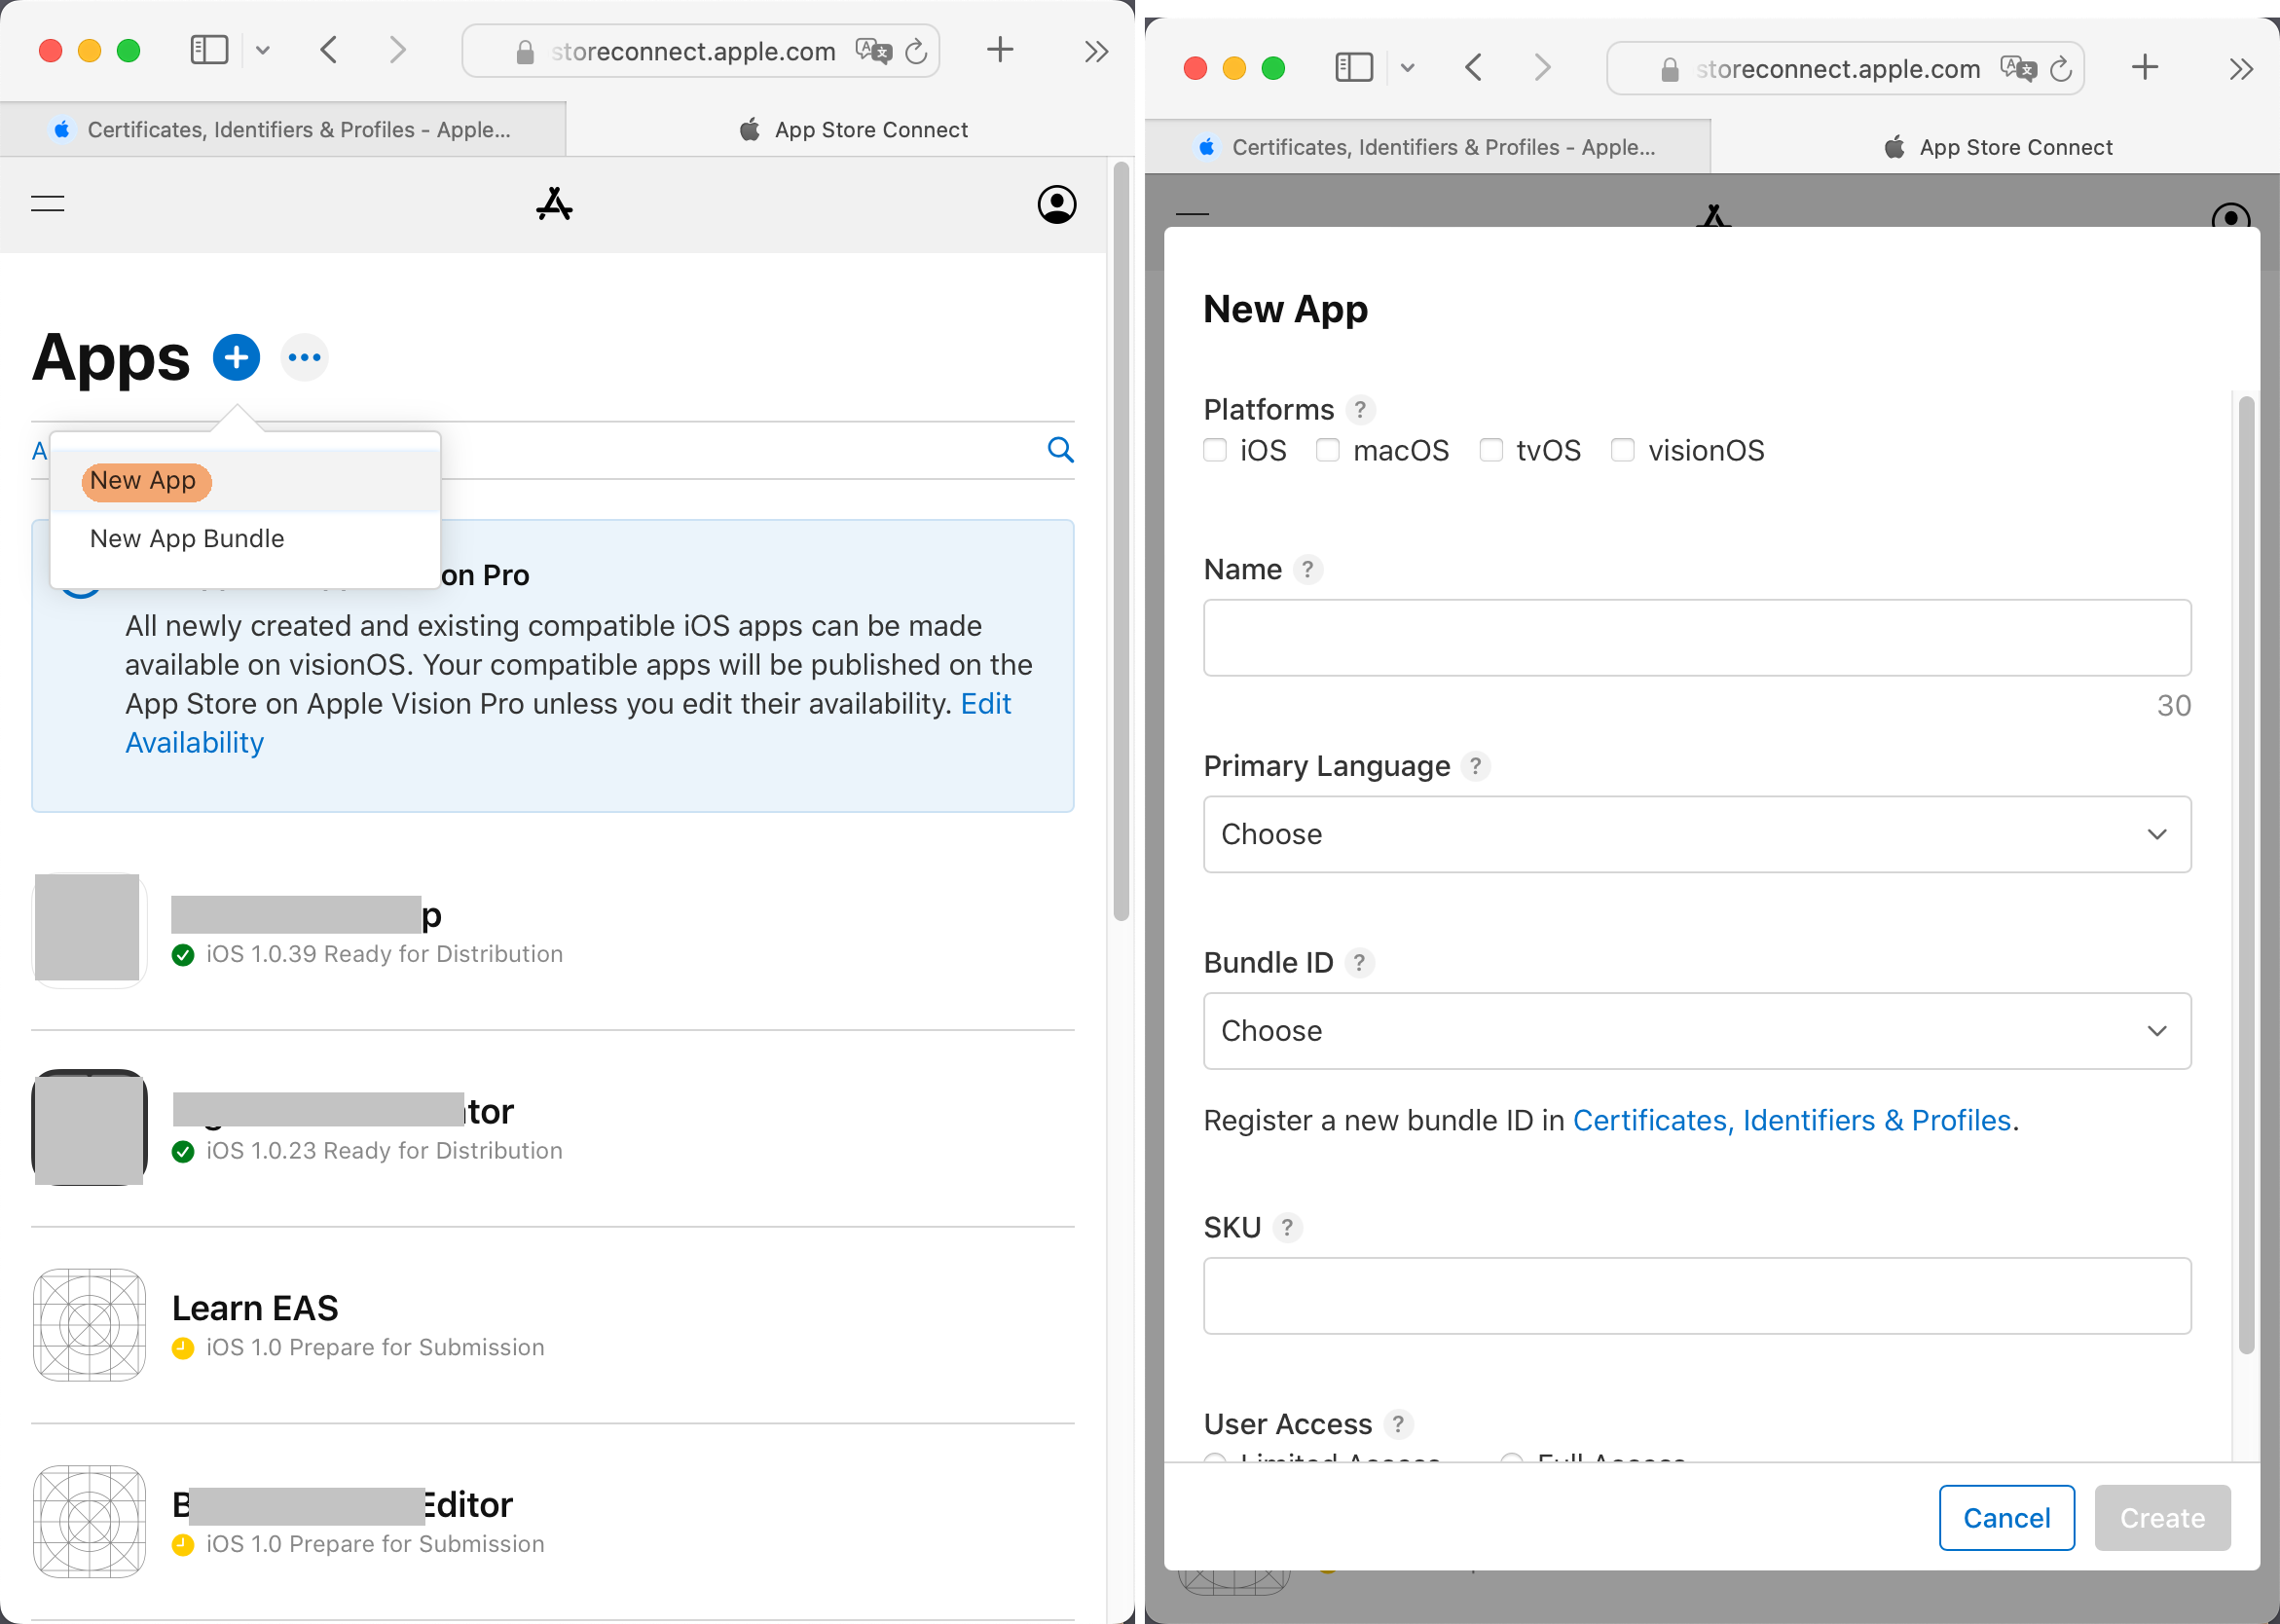
Create the Xcode Project
- Open
Xcode, and create a new project. - Update the project's
Bundle IDto the one you just created. Go to Project Navigator >app.xcodeproj>Signing & Capabilities>Signing>Bundle Identifier.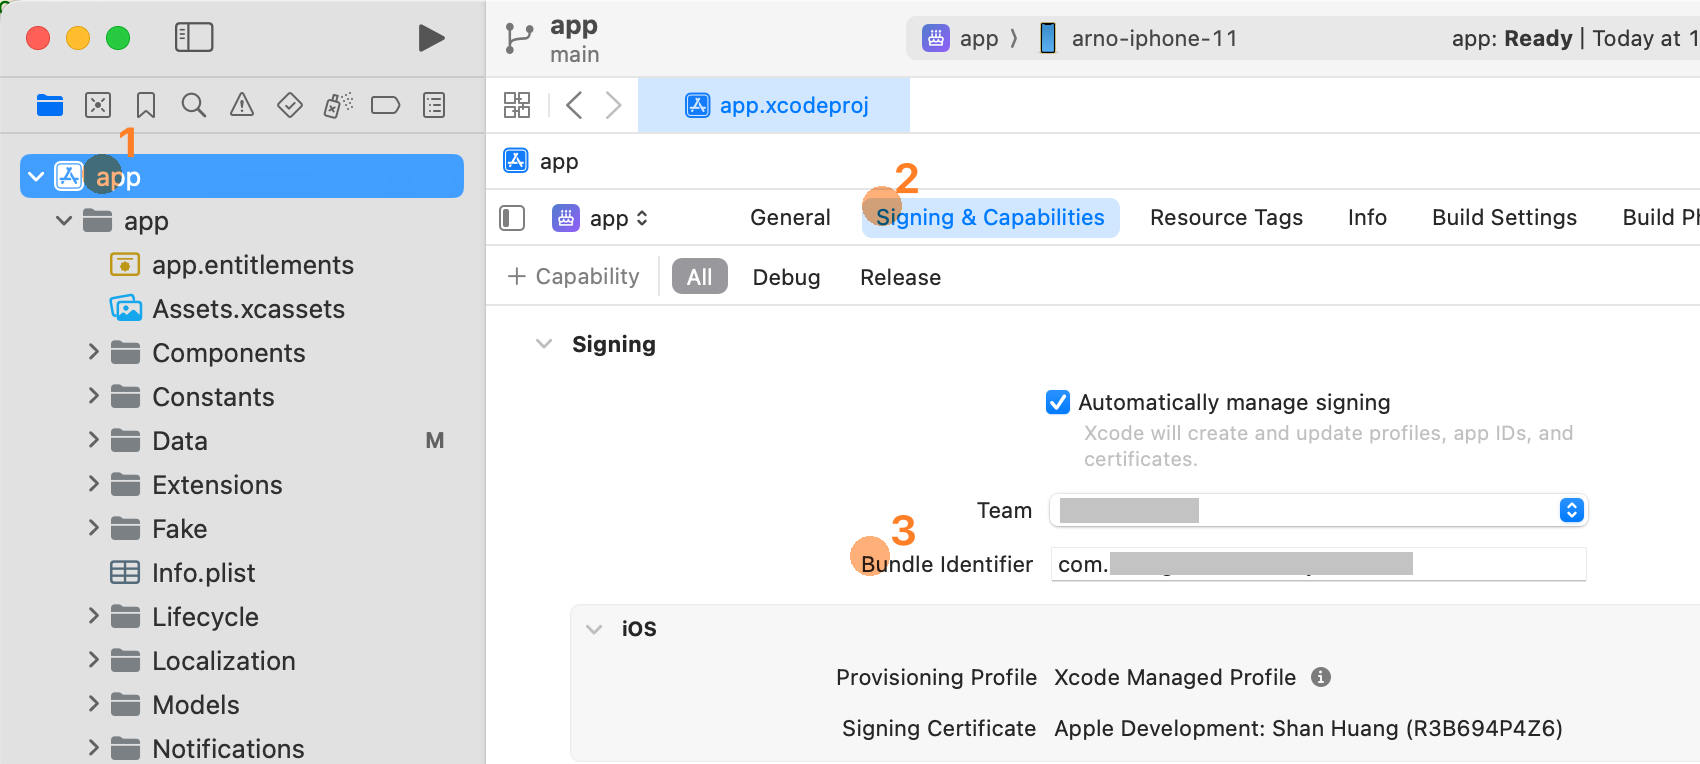
- After changing the
Bundle ID,Xcodewill automatically fetch a provisioning profile. Click theiicon next toProvisioning Profile. If everything is checked, it was successful.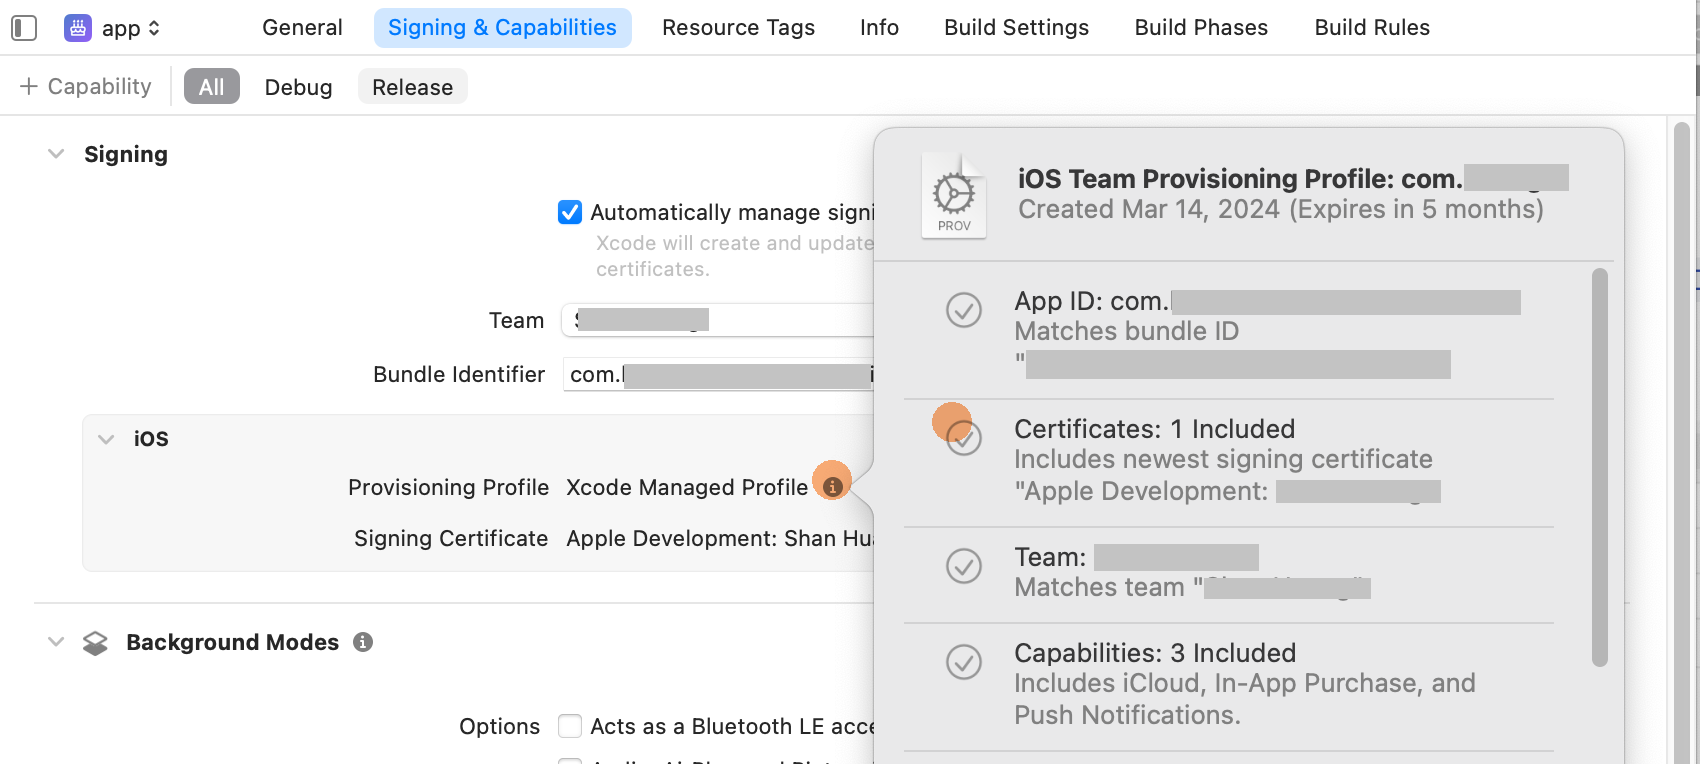
- Run the project on an iOS simulator to confirm it runs correctly.
Manual Build & Upload
WARNING
Before setting up Xcode Cloud auto-build, you must complete a manual upload. This ensures any problems you face during the cloud setup are truly due to Xcode Cloud, not the source code or TestFlight.
Set the App Icon
- This is required. Without an app icon, manual upload to
TestFlightwill fail. - The image must not have an alpha channel. If your icon has transparency,
Xcode Cloudwill fail to build. You can convert the icon toJPEGformat, which does not support alpha channels.
Set Encryption Settings
Set the ITSAppUsesNonExemptEncryption key in your Info.plist.
- This key specifies your app’s encryption usage. If you're unsure, set it to
false. - This is required. Without it, you'll have to manually specify encryption settings in App Store Connect each time.
<dict>
   ...
   <key>ITSAppUsesNonExemptEncryption</key>
   <false/>
</dict>
Build & Upload
- Set
Run DestinationtoAny iOS Device - Click Product > Archive from the top menu
- After building, an
Archiveswindow will appear (you can also open it via Window > Organizer). Select the new archive, then click Distribute App to begin uploading toTestFlight.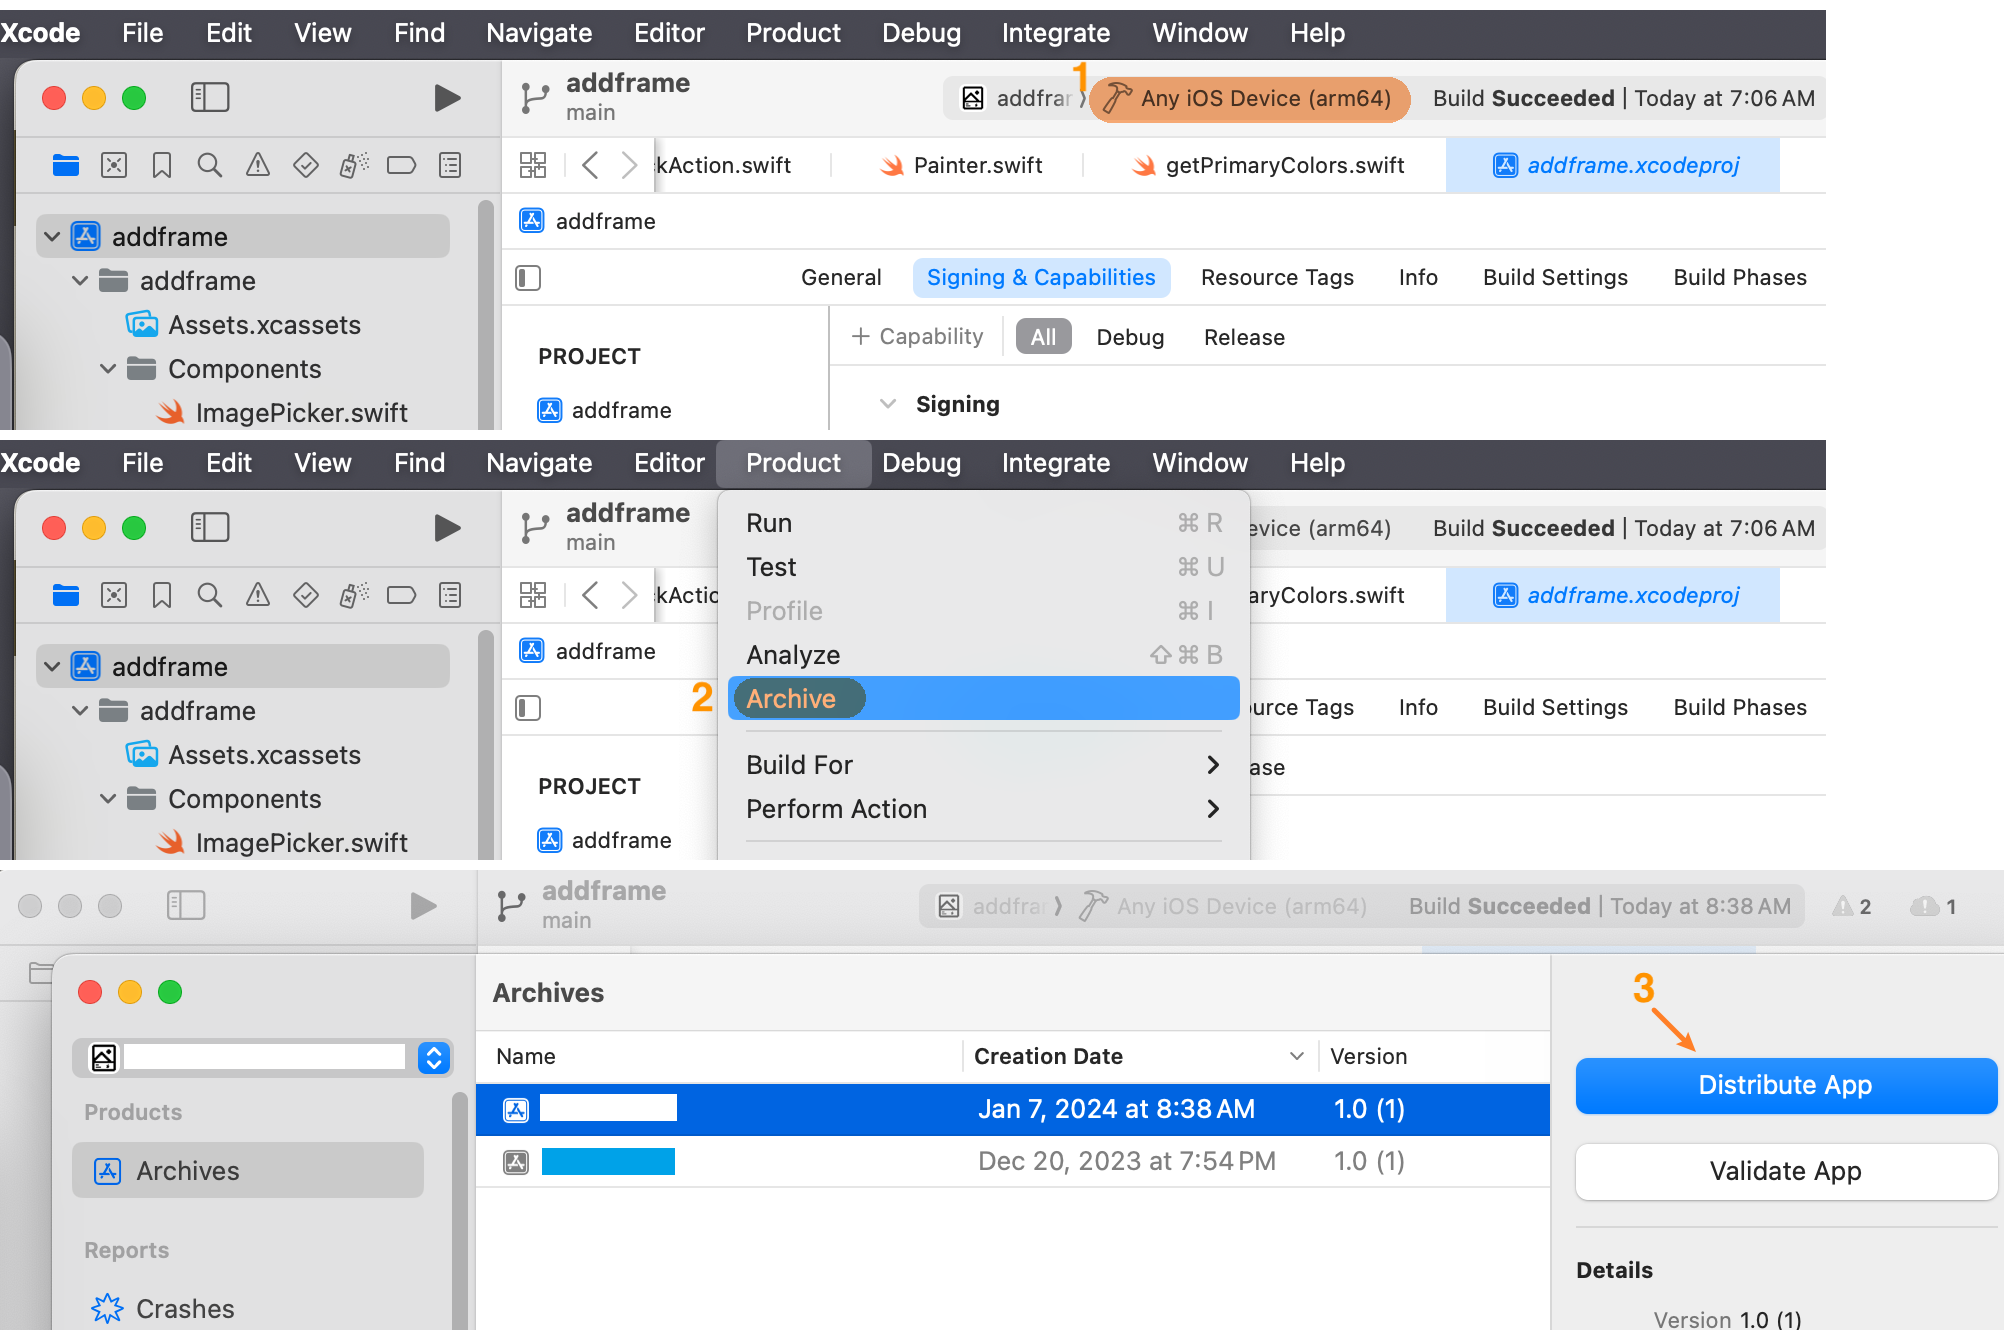
Create a TestFlight Testing Group
Once the
Archiveis uploaded, you’ll find it in App Store Connect > TestFlight.Create an
Internal Testinggroup.Add testers using their
Apple ID. An invite will be sent to their associated email.- Note: If a tester isn’t part of your developer team, their
Apple IDmust be added as a team member first.
- Note: If a tester isn’t part of your developer team, their
Accept the TestFlight Invitation
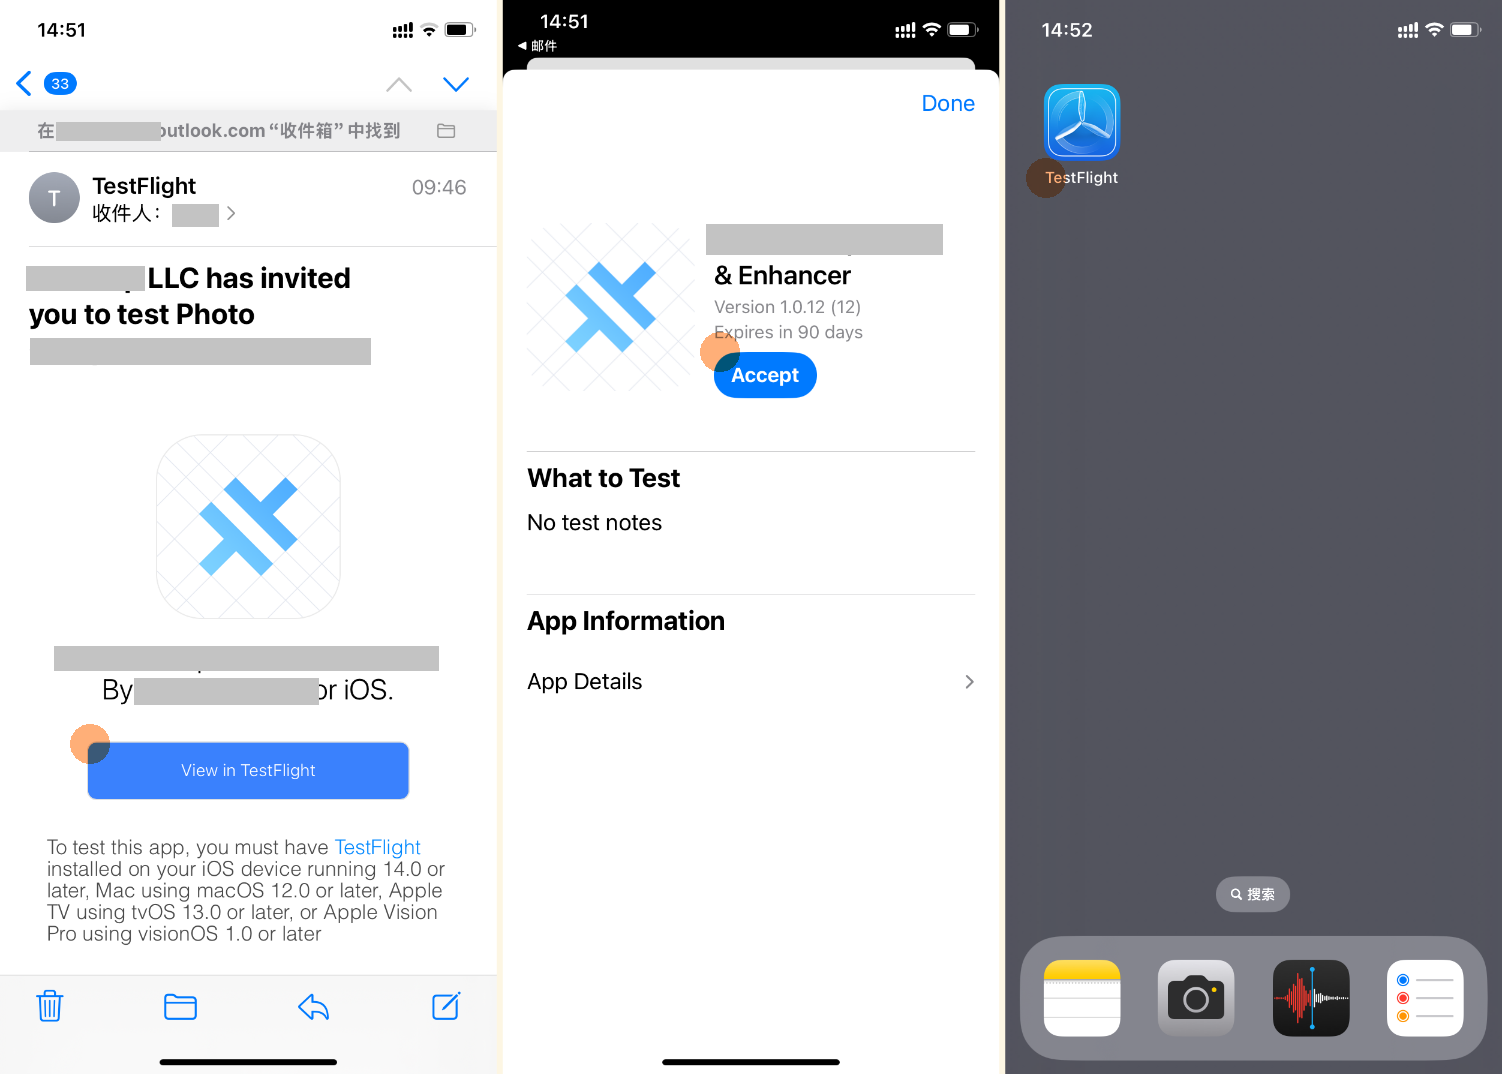
- Testers need to install the TestFlight app on their device.
- They should check their email and find the invitation from TestFlight.
- Click View in TestFlight in the email, open the TestFlight app, and tap Accept. They’ll now see your app in TestFlight and will get updates when new versions are available.
Upload Again
Bump the Version Number
To upload a new version to TestFlight, you must increase the version number in Project Navigator > app.xcodeproj > General > Identity, because TestFlight only accepts newer versions. 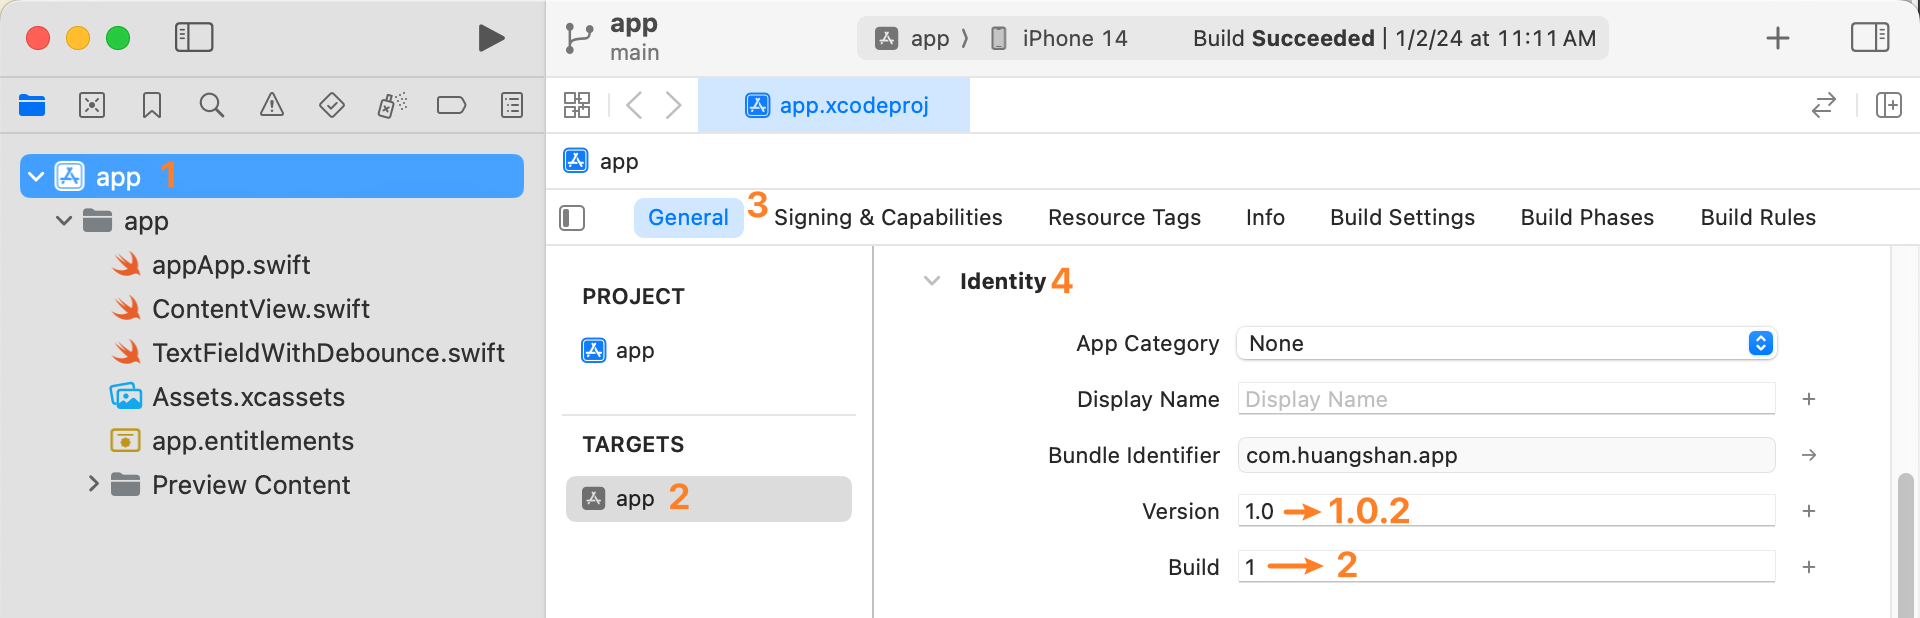
Xcode Cloud Auto Build & Upload
Once the Xcode Cloud workflow is set up, any push to the main branch on GitHub will trigger an automatic archive build and upload to TestFlight.
Auto Bump Version Number
According to Apple's documentation, Xcode Cloud runs ci_scripts/ci_post_clone.sh before building. You can write a JavaScript script in this file to bump the version number.
#!/bin/sh

export HOMEBREW_NO_INSTALL_CLEANUP=TRUE

# Install node start
brew install node
brew link node
# Install node end

# TODO: Replace "app" with the product name of Xcode project
node changeAppInfo.mjs app#!/usr/bin/env node
import fs from "node:fs/promises";
import path from "node:path";
import process from "node:process";
/**
* Alert! Must pass Xcode project name as first param of the script.
* ```sh
* # app is Xcode project name
* node changeAppInfo.mjs app
* ```
*/
async function main() {
try {
const args = process.argv.slice(2); // Skip the first two elements
const projectName = args.at(0)
if(projectName === undefined) {
throw new Error("[changeAppInfo] Must pass Xcode project name as first param of the script");
}
const configPath = path.resolve(`../${projectName}.xcodeproj/project.pbxproj`)
await increaseVersion(configPath)
}
catch (error) {
console.error(error)
process.exit(1)
}
}
/**
* Increase version automatically in project.pbxproj file
* Build #26 1.2 -> 1.2.26
* Build #27 1.2 -> 1.2.27
*/
async function increaseVersion(configPath) {
const configText = await fs.readFile(configPath, { encoding: 'utf-8' })
print(`Changing ${configPath}`)
const regex = /MARKETING_VERSION = (.+?);/g
const versionMatch = configText.match(regex)
if (versionMatch === null) {
throw new Error(`Cant get iOS bundle version in ${configPath}, terminate build`)
}
const bundleVersion = versionMatch[0].replace('MARKETING_VERSION = ', '').replace(';', '')
const ciBuildNumber = process.env.CI_BUILD_NUMBER
if(ciBuildNumber === undefined) {
throw new Error("[changeAppInfo] CI_BUILD_NUMBER is required, but it's undefined");
}
const finalBundleVersion = `${bundleVersion}.${ciBuildNumber}`
print(`Overwrite version: ${bundleVersion} -> ${finalBundleVersion}`)
const updatedConfigText = configText
.replace(regex, `MARKETING_VERSION = ${finalBundleVersion};`)
await fs.writeFile(configPath, updatedConfigText, { encoding: 'utf-8' })
}
function print(message) {
console.log(`[changeAppInfo] ${message}`)
}
main()No Transparent Pixels in App Icon
App icons must not contain transparent pixels. You can convert the icon to JPEG, which does not support alpha channels.
Create a GitHub Repository
- Create a
mainbranch and push it to GitHub. - (Optional) Create a
build_iosbranch used exclusively for triggering builds.
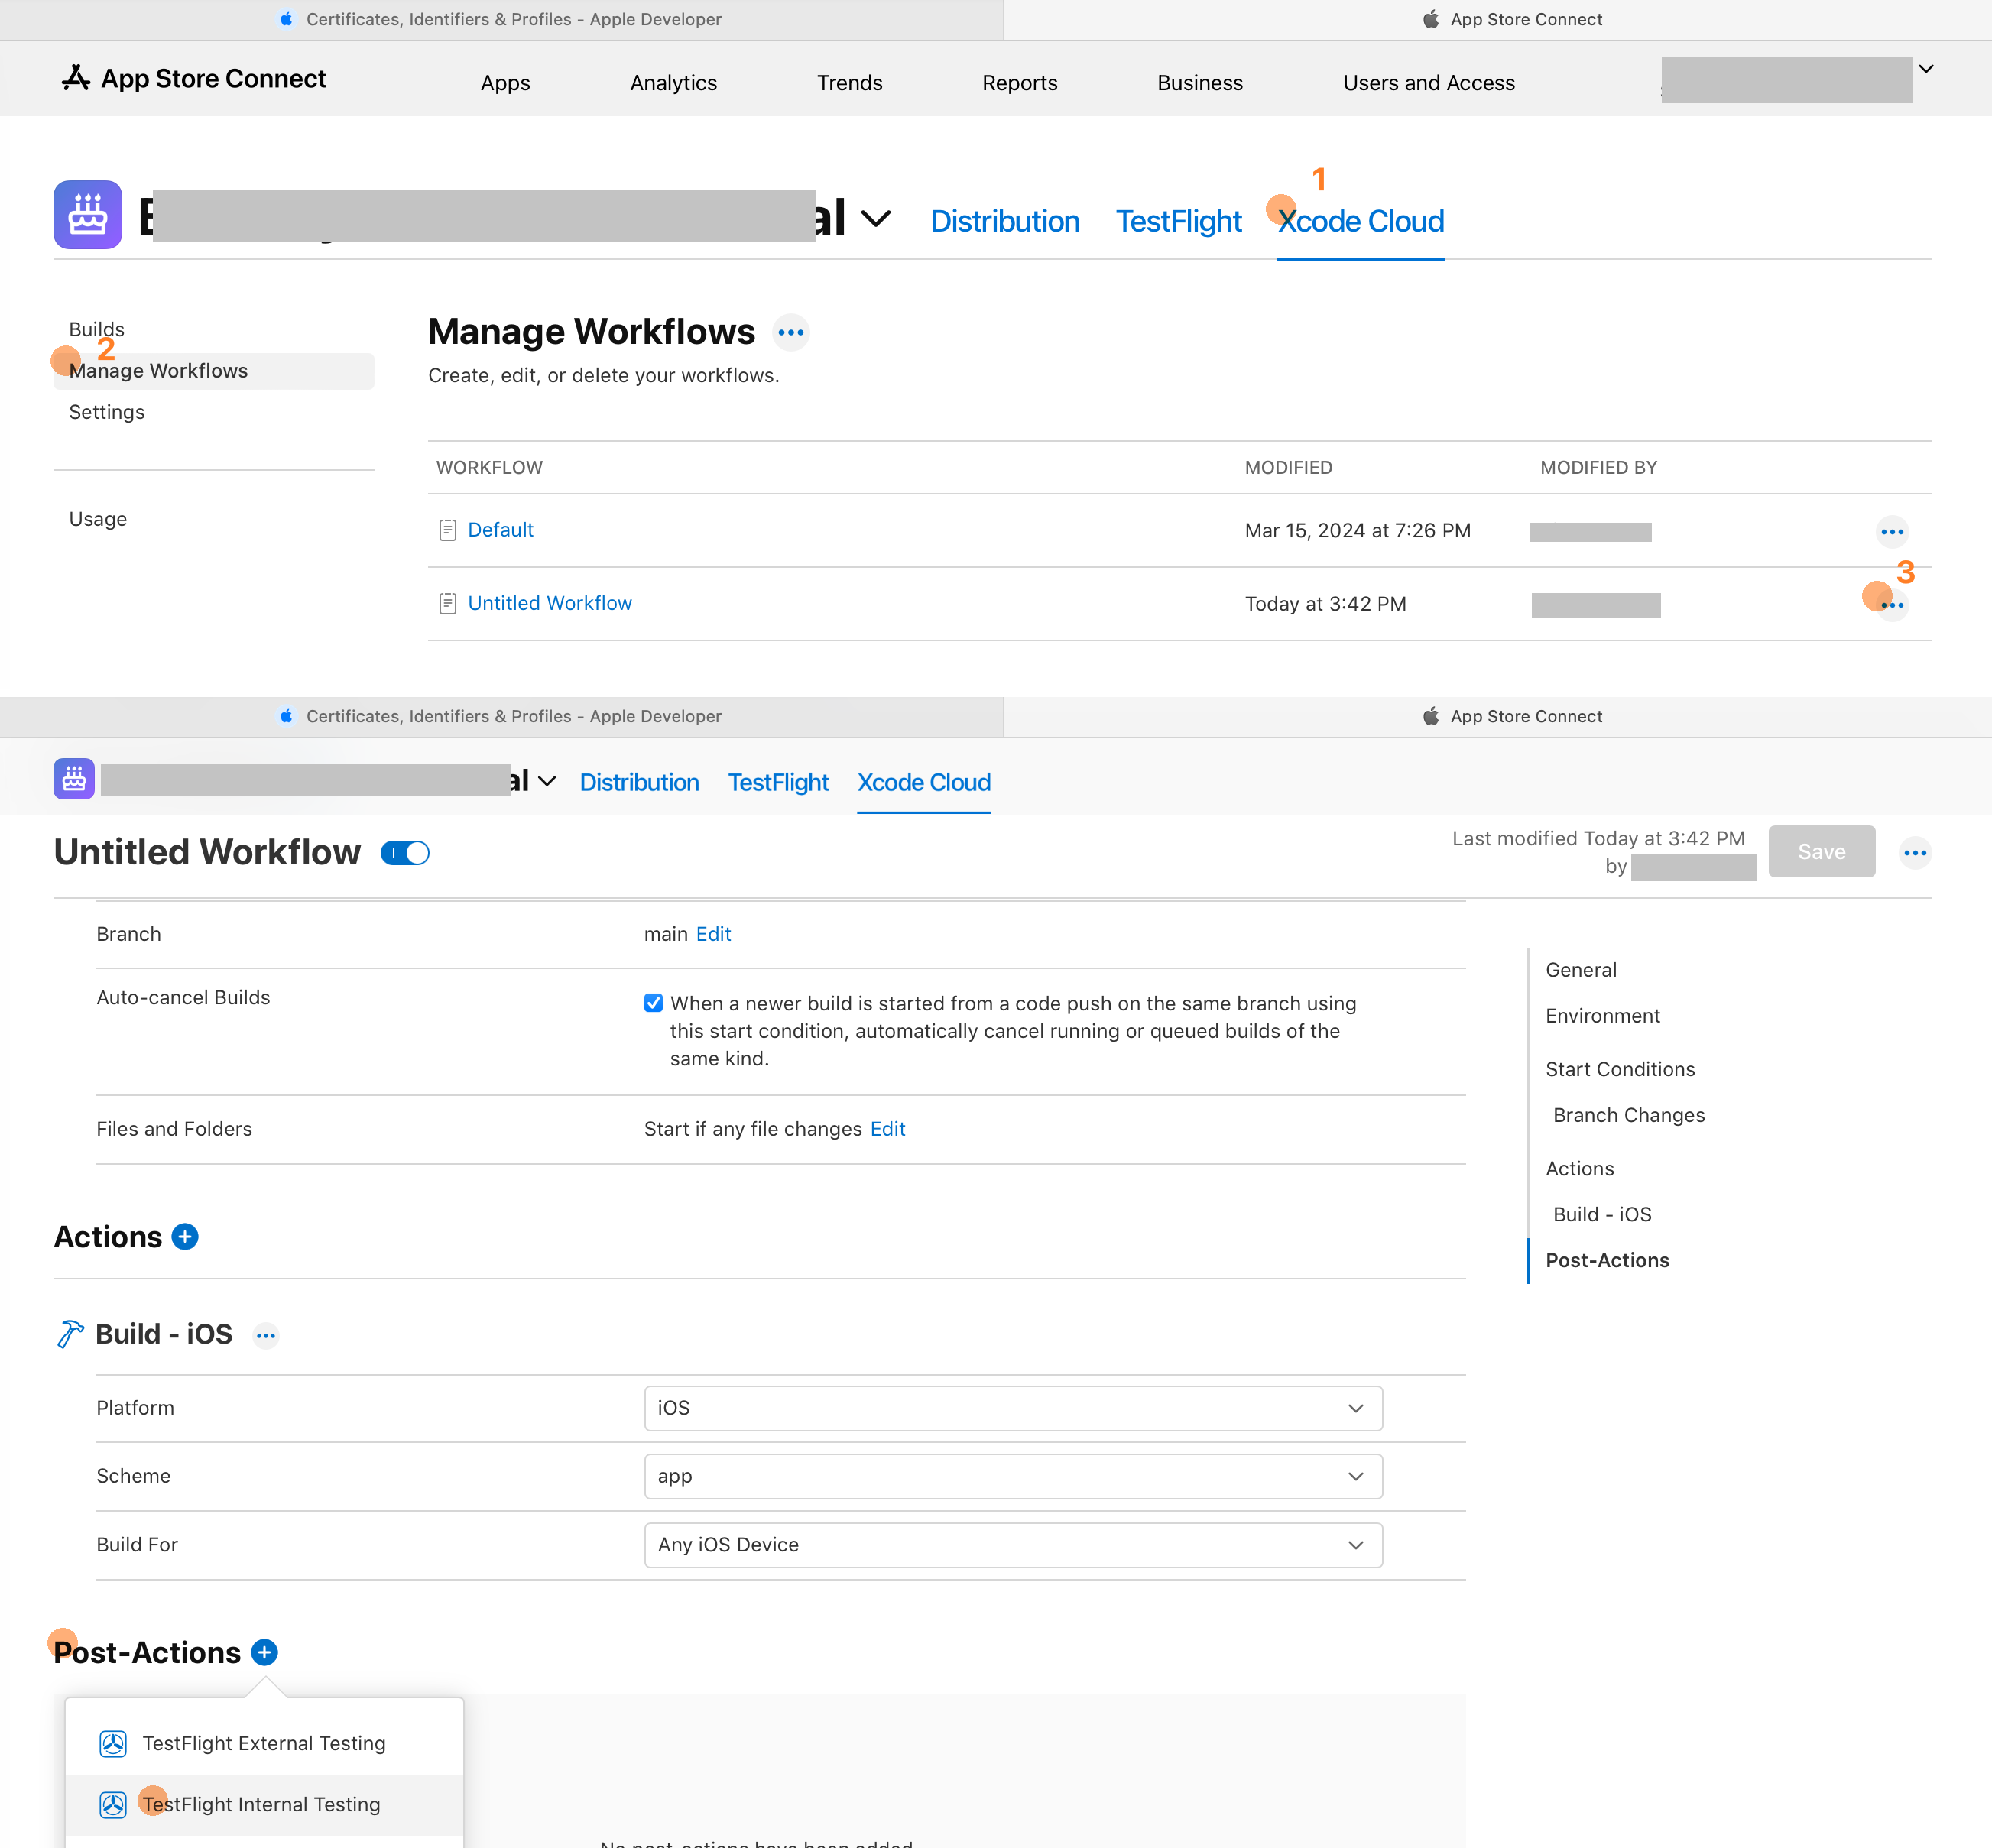
Create an Xcode Cloud Workflow
- In
Xcodego to Project Navigator > the rightmost tab > Cloud > Get Started
- Add an
Archiveaction to the workflow. SetDistribution PreparationtoApp Store Connectsince the build will eventually go to the App Store.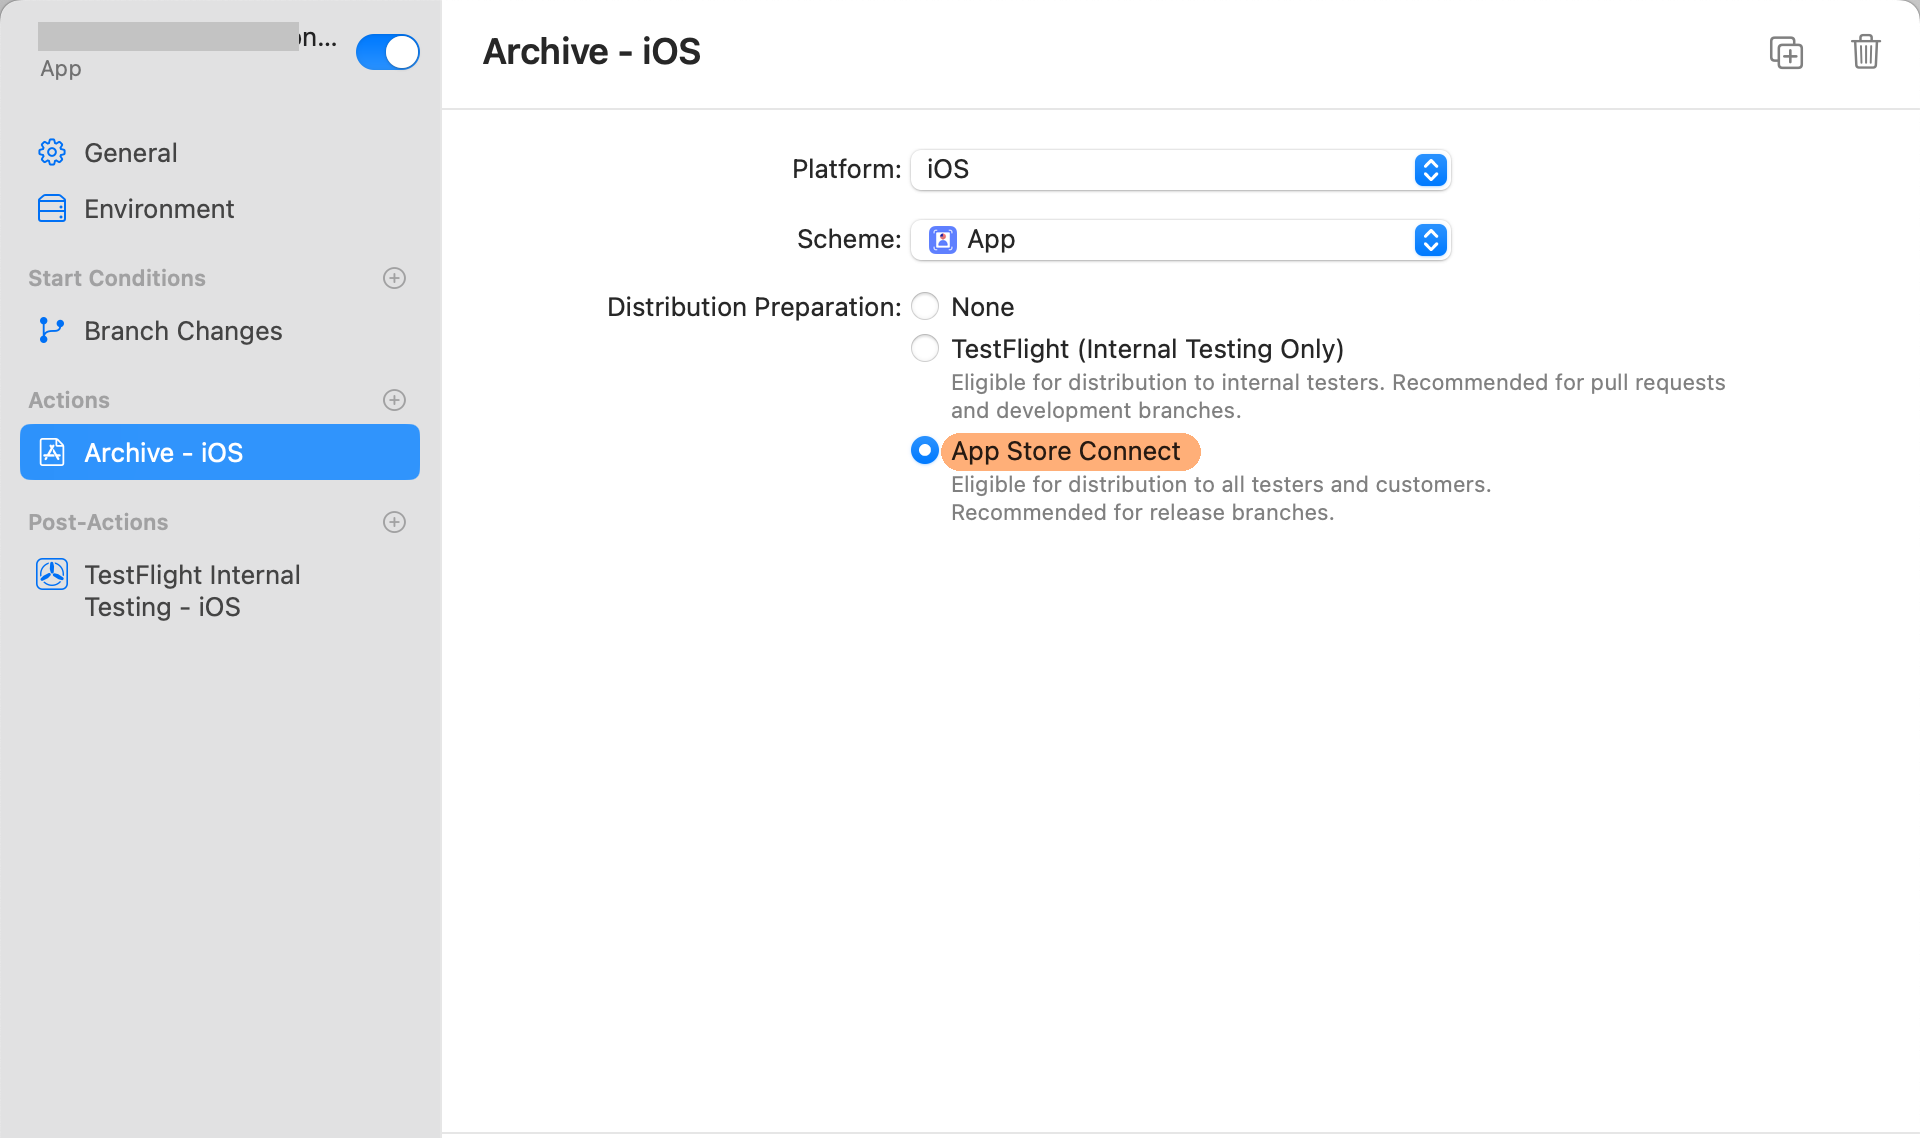
- During the initial setup, authorize Xcode Cloud to access your GitHub repository.

- Now, committing to the
mainbranch will trigger the workflow. You can view the progress on App Store Connect > Xcode Cloud.
Auto Publish to TestFlight After Build
Although the workflow builds the archive, it doesn’t auto-publish by default. Go to App Store Connect > Xcode Cloud, open the workflow, and add a Post-Action of type TestFlight Internal Testing. Select the testing group you created earlier. Now, every successful build will automatically be published to TestFlight.